Month: October 2016

Reclaimed Entryway Just in Time for Colder Weather

For a long time after we moved in, the area next to our front door was a dumping ground for anything and everything. There were boxes, excess furniture, chairs, and a dresser all there at one point.

Eventually, after several months (6), we figured out what we wanted to put there. Since our apartment is tiny, our number one priority was storage. I was having nightmares of the upcoming winter months (“Winter is Coming”) and gloves, hats, coats, and boots, just piling up on the floor.

Our first piece of the entryway was our reclaimed shelf. I spray painted two IKEA brackets copper and created the shelf itself from leftover wood from my dad’s shop. On top and out of the way, I purchased a set of 3 wicker baskets from Amazon that hold our helmets, bike locks, umbrellas, and soon to be hats and gloves.


Since moving in April, a place to hang our coats has not been a huge issue, but we are nearing the end of October and it needed to be addressed. To hold our coats,  I crafted some hooks out of old garden faucet handles that I have been collecting for a few years from antique fairs. Again, I “borrowed” a piece of aged and reclaimed wood from my dad.

entryway3

The most awesome piece of our entryway is the reclaimed bowling alley bench. The bowling alley was left over from a job my dad was working on, so I bought the legs on Amazon and we screwed it together. Viola!

Underneath the bench are two wire baskets I got on sale at Michael’s to hold our shoes. It is a miracle that they fit perfectly underneath the bench!

entryway7

All in all, the entryway was not that big of an investment, totaling about $140. It really makes the dining area look cozy and put together and totally worth it.

entryway4

Again, I would not have been able to do this without the expertise and help from my father. So shout out to him for being the best and helping my ideas become reality!

DIY: Knit Bunting

I am a sub-par knitter.

I have made probably 10 scarves and 5 sets of baby booties, but I have not ventured much beyond that.

Two years ago, I took the leap to try knitting socks using double pointed needles and I failed miserably.

Anyway, since I had some orange yarn, I wanted to do some crafting and knit these cute little pumpkins to put on my kitchen table. All the patterns I looked at called for DPNs. So I pulled out my DPNs that still had the 3 inches of poorly knitted sock attached. Once I slide that off, I attempted the evil needles again.

As per the last time, it was a mess. No amount of YouTube videos could save me. At that point, I decided to just knit something I knew how to do.

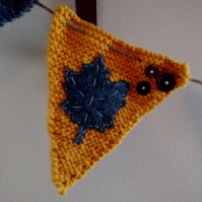
After perusing Pinterest for a bit, I came up with the idea to create a bunting banner. I was going to knit 6 triangles in 3 different colors. As I started knitting, the project evolved further. I started to envision felt leaves stitched onto each triangle. Then I thought of the button box my mom has of a million old buttons. Those would be accents sewn on.

First, I knit all 6 triangles using this pattern in yellow, orange, and gray. Second I needed to trace the leaves. Since I do not have a printer, I decided to just freehand the leaves and trace onto the felt from there. After I traced each leave twice, I carefully cut them out.

I played with color combinations before choosing which leaf would go where and then started to stitch them on.

bunting

Once the buttons were finished being attached in little clusters of three, I wove a piece of jute string through each triangle with my darning needle to be able to hang it up.

My weirdly planned project ended up turning out really well! It is a nice addition for homemade fall decorations. I loved it so much, I may start working on a Christmas version!

What do you think about it? Would you want one of these in your house to celebrate the changing of the seasons?

Doing Good on No New Clothes – Kinda?

Letting people know what you are doing really helps. I have been telling my mom and my friends so they know my goal is to not purchase any new clothes for the rest of this year.

Friends can be helpful and not helpful in this situation. Luckily, I have a helpful friend. Before going on a recent camping trip to Sleeping Bear Dunes National Lakeshore, I considered investing in some Keen sandals for our planned kayak down the Platte River. As I was asking a friend about her pair of Keens, she reminded me that I was not supposed to be buying anything.

I tried some excuses on her such as:

  • these are shoes, not clothes
  • they are a necessity (they aren’t, I don’t kayak that often)
  • they are a good deal
  • it is an investment
  • and so on and so forth

In the end, I knew she was right. So I did not buy them and I didn’t end up needing them for kayaking.


sleepingbear3

Sleeping Bear Dunes National Lakeshore – didn’t need new shoes for this! 


This situation reminded me of the time I gave up dessert for Lent. Since I could not have cookies, I ended up eating a bunch of donuts and pop tarts because I declared that they weren’t dessert, but breakfast items.

Anyway, while I have not been buying new clothes, I have noticed a slight uptick in buying things. Mostly it is stuff we needed, or replacing items with a more durable option. I am recycling our plastic soap dispensers and purchasing stainless steel pumps and bulk hand soap instead. To avoid any temptation, I try to peruse Craigslist and stay off of store websites.

At the moment, I myself have not purchased any new clothing or shoes. To be fair, I do have to mention that it is my birthday this month, so I have received some new clothing as gifts. Since I did not make the transaction, I am leaving that out for now.

Any suggestions for keeping friends and family on your side when you are trying not to spend?

Some Tiny Houses Have Bigger Kitchens

Our kitchen is SMALL. When people complain about having a small kitchen, they have no idea how small ours actually is. While it is not tiny house small,  it’s very small for something that is not a tiny house! We can fit a maximum of 4 people in our kitchen, and that would be just standing there, no movement allowed. There is barely enough room for two people to cook, so K kicks me out most of the time. Fine with me!

kitchen1

This is basically it. To the left of the fridge is where the kitchen ends.

We don’t even have a full-size fridge or oven, but I am not complaining about that.

We are low on counter space and low on usable space, so we had to start getting creative. As you can see in the above picture, our cutting board acts as extra counter space. Sometimes I will put it on top of the sink if I need more space to work on that side of the kitchen.

From the very beginning, we knew the pots and pans were going to take up too much room in one of our precious 3 drawers, so a pot rack and “S” hooks keep them contained over the stove and out of the way.


copper pans

Additional copper pots from my Grandmother have been added since this photo was taken.

The microwave was taking up too much valuable real estate on our countertop, which caused us to have to move anything on the counter in front of it to open it. Our solution was to raise it up. We then had space to store bread and goodies on top of and below the microwave. I ended up using an extending shelf made for organizing your cabinet. It fit with the kitchen and we could always end up using it later.

kitchen3

We have space above and below the microwave now!

While we really only have 3 cabinets, one is dedicated to dishes/glasses. So only 2 are left for storing dry goods. That is plenty of space, but these cabinets are very tall. I am not a short person, but I have to use a fold-out step stool to reach the top shelves. We had to organize so that the things we used the most were on the bottom and easiest to get at. Things used less often, like popping corn, were relegated to the top.

kitchen4

A shoe box and Tupperware worked just fine for this.

In the case of the cabinet over our fridge, it impossible to reach anything in the back. Things kept getting lost in there, so basically now we have way too much salt. To alleviate this, we used a system of categorized boxes that we could pull out when we needed. I wasn’t going to pay money for a plastic box, so I used a shoe box and the bottom part of a large piece of Tupperware. One box has all our oils/liquids, while the other has pasta and grains. There is a third box in one of our precious drawers that holds all our baking needs together.

kitchen2

I can only reach things that are at the very front of the cabinet over the fridge.

Last, but not least, underneath the sink can always get a little unruly. To keep together cleaning essentials, we used a plastic bucket that had been a part of a wedding guest gift. At first, I did not know what to do with the bucket, but we put it to good use. Works for us!

kitchen5

FYI that is my compost sitting in the container on the right.

Overall, we have a tiny kitchen, and I am okay with that. It keeps things contained and controlled. It is pretty easy to clean, I just have to spin around in a circle. It also keeps us from collecting/buying unnecessary items because we have absolutely nowhere to put them!